👋 Great designs start with great feedback. That’s what Workflow is built for. Start today.
Home - UX Design Tools - Sketch Layout and Grid Settings
Sketch Layout and Grid Settings
With today’s number of devices, the screen sizes you must design for also grow. Sketch’s layouts and grid settings are super helpful here. But, unfortunately, you have to create them yourself. Here’s how.
- Updated on January 3, 2024

In this post, we’ll discuss recommended layout and grid settings in Sketch and how to change them. The settings we recommend are compatible with common front-end frameworks and have been updated to be compatible with Sketch in 2024.
To make things better, we’ve also created a template you can download to apply the settings we talk about to your project right away.
Table of Contents
Would you rather watch a video about setup up your layout settings? Take a look at the video below where we show you how. 👇
How to change layout settings in Sketch
Before diving into recommended Sketch layout and grid settings, we first have to be able to change the layout settings available in Sketch. Here’s how you can do that.
- Open Sketch and open a (new) file.
- Go to the top menu.
- Select view, canvas, and finally, layout settings.
You will now see the dialog with Sketch’s layout settings, as seen in the image below.

These settings only apply to the pages you have selected.
If you want to work as efficiently as possible, I suggest setting your settings immediately and selecting the ‘make default setting’ option at the bottom of the dialog.
Recommended layout settings in Sketch
Once you’ve found your Sketch layout dialog, it is time to set up your settings.
As you can see, the layout dialog in Sketch shows several settings you can play around with. These include the following.
- Total width.
- Offset.
- The number of columns.
- Gutter width.
- Column width.
- Gutter height.
- Row height.
This list of layout settings can seem overwhelming at first but don’t worry. These settings are connected. By changing the total width and the number of columns, most other layout settings adjust accordingly.
In some cases, you do not need to use rows. Because of this, you do not need to set the gutter height and row height.
With this in mind, I hope that changing the layout settings in Sketch becomes more manageable. So, let’s go through the settings now step by step.
Total width and offset
First, we will set the total width of our Sketch layout. Align your settings with popular CSS frameworks like Bootstrap or Bulma. This way, you ensure a clear and easy handover with the development team of your project. To do so, we’re going to set some breakpoints.
In responsive design, a breakpoint is the screen width where the design shifts from one screen size to the next.
Here’s an overview of common breakpoints.
- Extra small: 360px.
- Small: 576px.
- Medium: 768px.
- Large: 1080px.
- Extra large: 1440px.
The small and extra small breakpoints are generally used for mobile devices. You can use the medium breakpoints for tablets. Everything from large and up is used for desktop devices.
Sketch has a nice feature where you can create artboards depending on these breakpoints. It will significantly help you with your layout settings.
As for the offset, you can have Sketch calculate the offset by selecting the ‘center’ button in the layout dialog. By centering the layout, you create an equal offset on both sides of the Sketch layout. It is a best practice in UI design.
Number of columns, column width, and gutter width
Now that we have the total width and offset, setting up the number of columns is up next. Twelve is the key number here.
The exciting thing about the breakpoints mentioned above is that you can divide them all by 12. Then, add line heights and padding in multitudes of 12.
Congratulations, you’re looking at your first grid. You can set all of these using Sketch. 12 is indeed the magic layout number here.
If you set the number of columns to 12, you can always use multiple columns together to get to fewer columns. I recommend setting the number of columns to 6 and 2 for tablet and mobile, respectively.
Set the gutter width to a multitude of 12 as well. I usually go for 24px. When you do, Sketch automatically calculates the column width to fit your other layout settings.
Sketch layout and grid template
Layout and grid settings give a designer many options for setting up a project in Sketch. To help you, I’ve created a template that includes everything mentioned in this article and more.
- Common breakpoints.
- Layout settings.
- Examples and best practices.
- Project starter page.
- Compatible with Sketch and Adobe XD.
The Sketch layout and grid template is available on Gumroad for $4. Click the button below to check it out.
Frequently asked questions
As with many of my posts, I finish this post with several frequently asked questions about the subject matter. In this case, I’m answering some Sketch layout and grid questions. So let’s take a look.
How do I add a grid in Sketch?
Adding a grid in Sketch works almost the same as creating a layout. I’m going to assume that you already have a Sketch file open.
- Once again, go to the top menu of Sketch.
- Go to view, canvas, and finish by selecting grid settings.
Take a look at the following screenshot. It shows the dialog you should have in front of you if you’ve followed these steps correctly.
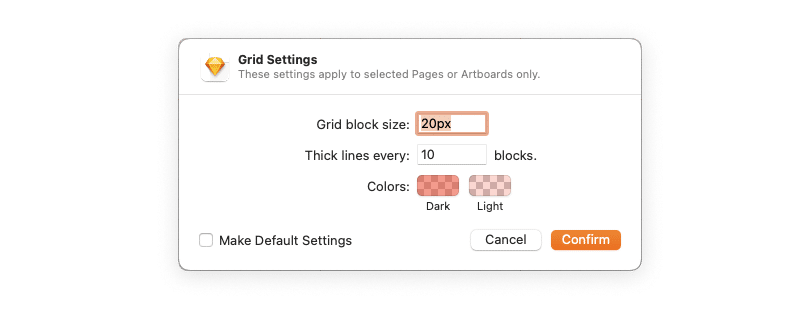
As you can see, adding a grid to Sketch requires less user input than adding a layout. You only have to add the grid block size and the number of blocks until you add a thick grid line.
It is an easy process. You can create a grid in Sketch to follow almost any rule as long as you’re consistent. So if you use an 8-pixel grid for your layouts, do the same for your grids.
How do you repeat a grid in Sketch?
Repeating a grid in Sketch is easy. However, repeating a grid can mean two things depending on your goal.
Repeating a grid within one Sketch artboard is a feature of grids itself. That’s just what grids do.
The best way to repeat grids across multiple pages is to select multiple pages before opening the grid settings dialog. The settings you choose now will be applied to all selected pages.
Another way would be to use a Sketch plugin like Craft.
How do I turn on smart guides in Sketch?
You can turn on smart guides in Sketch using one of two ways. Both of them are easy to accomplish. Here’s how you can do it.
- Go to the View menu in Sketch. Select Canvas and ‘Show all guides.’
- The second option to enable smart guides in Sketch is to right-click on one of the rulers and select ‘Show all guides’ from there.
Further reading
Having a clear layout and grid setup in Sketch can help boost productivity in a significant way. In addition to these settings, you can apply many more options to boost your work in Sketch.
You can look at our list of Sketch plugins, for example. There’s also our guide on picking the right design tool in the first place.
👋 Turn good design to great design, with feedback you actually need. Get it on Workflow.

About the author
Hi! I'm Nick Groeneveld, a senior designer from the Netherlands with experience in UX, visual design, and research. I'm a UX coach that supports other designers and have completed design projects in finance, tech, and the public sector.
☎️ Book a 1:1 mentor meeting or let's connect on LinkedIn and Twitter.